Knitting seed stitch is a popular way to add some fun and texture to your knitting projects. And the best part: it’s so easy that even beginners will master it in no time!
The seed stitch is a simple stitch pattern that creates a structured and reversible fabric. It lays perfectly flat, doesn’t curl in on the edges and is moderately stretchy, making it great for different kind of projects. And you only need to know the knit stitch and the purl stitch.
In this step-by-step tutorial on knitting seed stitch, you will find everything you need to know about the seed stitch. In addition, I will show you the easiest ways to knit the seed stitch.
So grab your needles and some yarn, and let’s get knitting with the seed stitch!

What is a Seed Stitch?
The seed stitch is a basic knitting stitch that creates a bumpy, textured fabric with a reversible pattern. Unlike many other common knitting stitches, which are made up of rows of knits and purls, the seed stitch involves alternating knits and purls within each row, which gives it its distinctive texture.
When knitting seed stitch, you simply alternate between knit and purl stitches. In other words, you will knit every other stitch and purl every other stitch across the row. Then, on the next row, you will knit the purl stitches and purl the knit stitches.
This creates a pattern that looks like little bumps or seeds, hence the name “seed stitch”. The seed stitch is sometimes also called British moss stitch. Make sure not to confuse this with the Irish moss stitch or American moss, which is sometimes also called just the moss stitch.
The seed stitch is reversible, meaning that it looks the same on both sides, making it perfect for scarves, throw blankets, and other items where both sides of the knitting will show. This beautiful stitch pattern will look at its best especially on large surfaces.
The seed stitch lays perfectly flat and doesn’t curl in on the edges. This means that you can knit the seed stitch for example on the edges of a stockinette stitch to keep it flat. In addition, it is moderately stretchy, making it perfect also for cuffs.
Knitting seed stitch is a great choice for beginners who are looking to add more texture and variety to their knitting projects. It can be used in a variety of different ways to create interesting patterns and designs.

How To Knit Seed Stitch
If you are new to knitting or have never tried knitting seed stitch before, don’t worry. It’s actually a very simple technique that anyone can learn.
First, you will cast on the number of stitches you need. And then you will just alternate between knit and purl stitches so that on each row, a purl stitch sits on top of a knit stitch and a knit stitch sits on top of a purl stitch. This is what gives the seed stitch it’s beautiful texture.
Even and odd number of stitches are knitted differently. While both methods are easy, knitting with an odd number of stitches is easier for beginners. That’s because you will knit each row the same way: each row starts and ends with a knit stitch.
Let’s take a closer look at how to knit the seed stitch with even and odd number of stitches.
Knitting With Even Number of Stitches
- Row 1: Knit 1 stitch and purl 1 stitch. Repeat to the end of the row.
- Row 2: Purl 1 stitch and knit 1 stitch. Repeat to the end of the row.
Continue repeating these two rows until your work is the desired length.


In short, knitting seed stitch is an easy 2-row repeat. All you have to do is to repeat row 1 and row 2 over and over again.
Here’s how to easily keep track of the repeat: Start every odd-numbered or right-side row (cast-on tail on the right) with a knit stitch and every even-numbered or wrong-side row (cast-on tail on the left) with a purl stitch.
Knitting With Odd Number of Stitches
- Row 1: Knit 1 stitch and purl 1 stitch. Repeat until you reach the last stitch. Knit the last stitch.
Repeat this one row until your work reaches the desired length.
As you can see, knitting with an odd number of stitches is even easier as you will knit each row the same way. All you need to remember is to knit one final stitch at the very end of each row.

Seed Stitch the Easy Way
If it’s difficult for you to keep track of the pattern and remember which row you should be knitting next, there is an easy alternative way to approach knitting seed stitch.
To use this easy way to knit seed stitch, cast on ANY number of stitches. You can have an odd or even number of stitches.
Next, knit your first row as follows:
- Row 1: Knit 1 stitch and purl 1 stitch. Repeat to the end of the row. The last stitch can be either a knit stitch or a purl stitch.
Then you will just knit the purl stitches and purl the knit stitches in the next rows until your work is the desired length.
This way, you don’t need to keep track of the pattern!
What’s the catch with knitting seed stitch the easy way? Honestly, there’s no catch. All you need to do is to recognize your knit and purls.
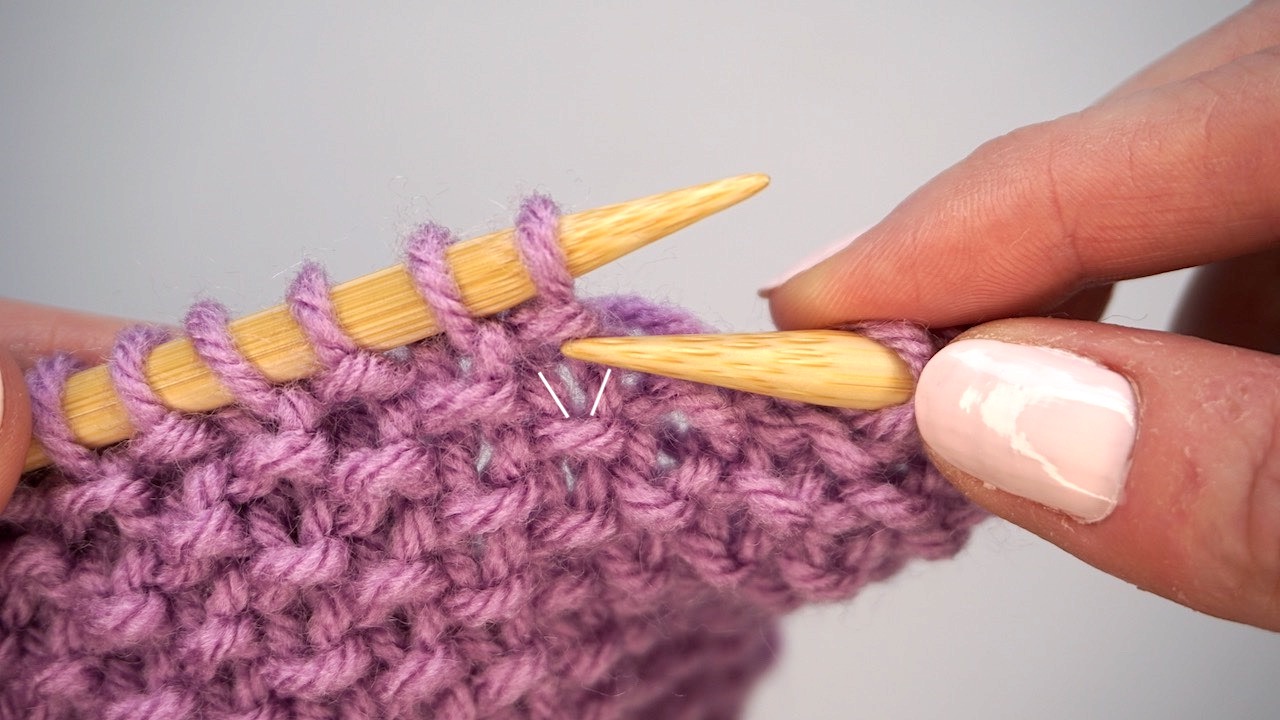
Here’s how to do it: A knit stitch looks like a flat V shape, while a purl stitch looks like a little bump.
Once you have identified the stitch, you just do the opposite and knit the purls and purl the knits. Simple as that!

Binding Off With Seed Stitch
Once you’re finished knitting, it’s time to bind off in pattern. And by the way, it doesn’t matter, with which row you end your project.
Binding off in pattern on seed stitch means that you will do the regular bind off, but instead of knitting every stitch you will work each stitch as if you were still knitting seed stitch. In other words, you will knit the purls and purl the knits.

How To Knit Seed Stitch in the Round
Knitting seed stitch in the round, that is with double pointed needles or circular needles, is as simple as knitting seed stitch in flat.
Basically, the only difference is that you need to use a stitch marker. When you are knitting in the round, place a stitch marker when joining in the round to mark the beginning of rounds. Since you will not turn your work in between the rounds, a stitch marker will tell you where one round ends and another begins.
But the basic instructions for knitting seed stitch in flat also apply when knitting seed stitch in the round. This means that you will be repeating only two rows until you are happy with the size.
If you have an even number of stitches:
- Round 1: Knit 1 stitch and purl 1 stitch. Repeat to the end of the round.
- Round 2: Purl 1 stitch and knit 1 stitch. Repeat to the end of the round.
- Continue repeating these two rounds until your work is the desired length.
If you have an odd number of stitches:
- Round 1: Knit 1 stitch and purl 1 stitch. Repeat until you reach the last stitch. Knit the last stitch.
- Round 2: Purl 1 stitch and knit 1 stitch. Repeat until you reach the last stitch. Purl the last stitch.
- Continue repeating these two rounds until your work is the desired length.
Alternatively, you can also follow the instructions for knitting seed stitch the easy way where you can have an odd or even number of stitches.
- Round 1: Knit 1 stitch and purl 1 stitch. Repeat to the end of the round. The last stitch can be either a knit stitch or a purl stitch.
- Knit the purl stitches and purl the knit stitches in the next rounds until your work reaches the desired length.
Issues With Knitting Seed Stitch
There are a few things that go wrong when knitting seed stitch even though the instructions are simple.
But don’t worry, all issues with seed stitch can be easily avoided.
Uneven Tension
Having a looser tension when purling and a tighter tension when knitting is not uncommon. And this is not something that only beginner knitters are struggling with but also experienced knitters sometimes have issues with their tension.
Knitting seed stitch with an uneven tension will result in holes. So, as you alternate between knit and purl stitches, make sure to keep your yarn tension consistent between the two types of stitches.

Accidental Yarn Overs
Another way to create holes when knitting seed stitch is to do an accidental yarn over.
This happens when the right needle gets in the way and thus the yarn will not be at the back of the work but instead it gets stuck in the front of the work. So, be careful not to do this.

Seed Stitch Looks Like Ribbing
One of the most common issues beginner knitters encounter when knitting seed stitch is that their seed stitch turns into rib stitch knitting.
The reason for this is that you knit into a knit stitch and purl into a purl stitch. This results into a 1×1 rib stitch.
Both seed stitch and 1×1 rib stitch alternate between one knit stitch and one purl stitch. But in a ribbing, knits and purls are stacked on top of each other forming neat columns of stitches. Whereas in seed stitch, knits and purls have a 1-stitch offset.

The best way to avoid this issue is to learn to recognize knit and purl stitches.
So, if it looks like a purl stitch, you will knit it and if it looks like a knit stitch you will purl it. If you end up working on the stitches the other way around, there’s no way to fix that. All you can do is unravel and start over again.
A quick fix for this issue will be to work seed stitch on an odd number of stitches and remember to start each row with a knit stitch. However, this is not guaranteed fix as some patterns require an even number of stitches and also the number of stitches may change due to increasing and decreasing.
What Is the Difference Between Seed Stitch and Moss Stitch?
The seed stitch and the moss stitch are very similar and they often get confused. You create both of these textured fabrics by knitting one and purling one stitch across the rows and alternating the order of these stitches on each row.
The difference is how often you repeat the rows. The seed stitch is a 2-row repeat where you will work one row of knitting 1 and purling 1 and then one row of purling 1 and knitting 1.
Whereas the moss stitch is a 4-row repeat where you will work two rows of knitting 1 and purling 1 and then two rows of purling 1 and knitting 1. In other words, the moss stitch is an elongated seed stitch. You can find the tutorial for knitting moss stitch here.

Conclusions
Well, there you have it! Knitting seed stitch is a fun and easy way to add some texture to your projects. With just a simple and easy-to-learn pattern of knit and purl stitches, even beginners can master this stitch in no time.
Whether you’re making a cozy scarf or a stylish hat, seed stitch can be used in a variety of projects. And with its reversible and non-curling nature, it’s a versatile stitch that is both functional and beautiful.
So go ahead and give it a try on your next project, and enjoy the beautiful texture and dimension it adds to your knitting. Grab your needles and yarn and start practicing knitting seed stitch today!
Read also: