Knitted potholders are popular and rewarding knitting projects for all knitters. Not only are they practical accessories but a fun and easy way to add a personal touch to your kitchen. They are also great knitted gifts for housewarmings or for people who love to cook.
A knitted potholder is a quick and easy project that can be completed in just a few hours.
Whether you are a beginner or an experienced knitter, knitting potholders is a great way to use up leftover yarn and experiment with different color combinations and stitch patterns. There are many patterns and designs available to suit your skill level and personal style.
This article contains two different knitted potholder patterns for beginner level knitters:
This post features affiliate links. If you use these links to buy something I may earn a commission at no additional cost to you. As an Amazon Affiliate I earn from qualifying purchases.

Getting Started With Knitting Potholders
Before you can start knitting your potholder, you first need to get the materials for your project. Here are some tips for how to choose the yarn and needles so that the final product will be usable and you won’t burn your fingers.
What Is the Best Yarn for Potholders?
Cotton and wool are the best yarns for potholders because of their natural properties.
Both yarns are heat-resistant and durable and easy to care for as they can be washed. You can machine-wash and dry cotton care free, whereas naturally stain-resistant wool needs to be washed with care on a gentle cycle with cold water to avoid felting and air-dried, preferably flat.
You can also use other yarn made with natural fibers, such as flax, hemp, or alpaca. Just make sure to use yarn with 100% natural fibers and not a blended one, such as a wool sock yarn, with nylon in it. All in all, do not use synthetic yarns, like acrylic or polyester, for potholders because they melt easily.
Another thing you want to keep in mind is the thickness of the yarn. In general, thicker yarns are more heat resistant than thinner yarns. However, you can also use thinner yarns if you knit it double or with two strands of yarn. Another option is to knit in the round making the fabric double with air in between the fabrics and thus more heat resistant.
You can read more about different types of yarn here to help you choose the perfect yarn for your potholder.
How To Choose the Needles?
In general, potholders should be knitted pretty tight so that the fabric is not loose. This way, you don’t end up burning your hands and fingers when handling hot pans and pots.
For this reason, I recommend choosing a bit smaller needles than what your yarn says you should use. When the needles are smaller, you will automatically produce a tighter fabric and you will not have to worry about the gauge too much as the beginner.
This is what I always do with my knitted potholders and I have taken this into account also in these potholder patterns. So if you’re using medium weight yarn like these instructions says, you are good to go with the needles in size US 6 (4mm).
As far as the material goes, I recommend wood or bamboo needles since they’re less slippery than metal needles.
Easy Knitted Potholder in Garter Stitch
This easy knitted potholder pattern in garter stitch is perfect for beginners. It includes only few basic techniques, such as casting on, knitting, and binding off, making it a perfect place to start your knitting career.
Garter stitch creates a simple but beautiful fabric with horizontal rows know as garter ridges. Garter stitch fabric is quite stretchy and also relatively dense, so it’s an excellent choice for knitted potholders. When using garter stitch, both the right side and the wrong side of the potholder look the same.

Materials You Will Need for This Potholder
- Medium weight yarn
- US 6 (4mm) straight needles or double pointed needles
- Tapestry needle
- Scissors
How To Knit a Potholder
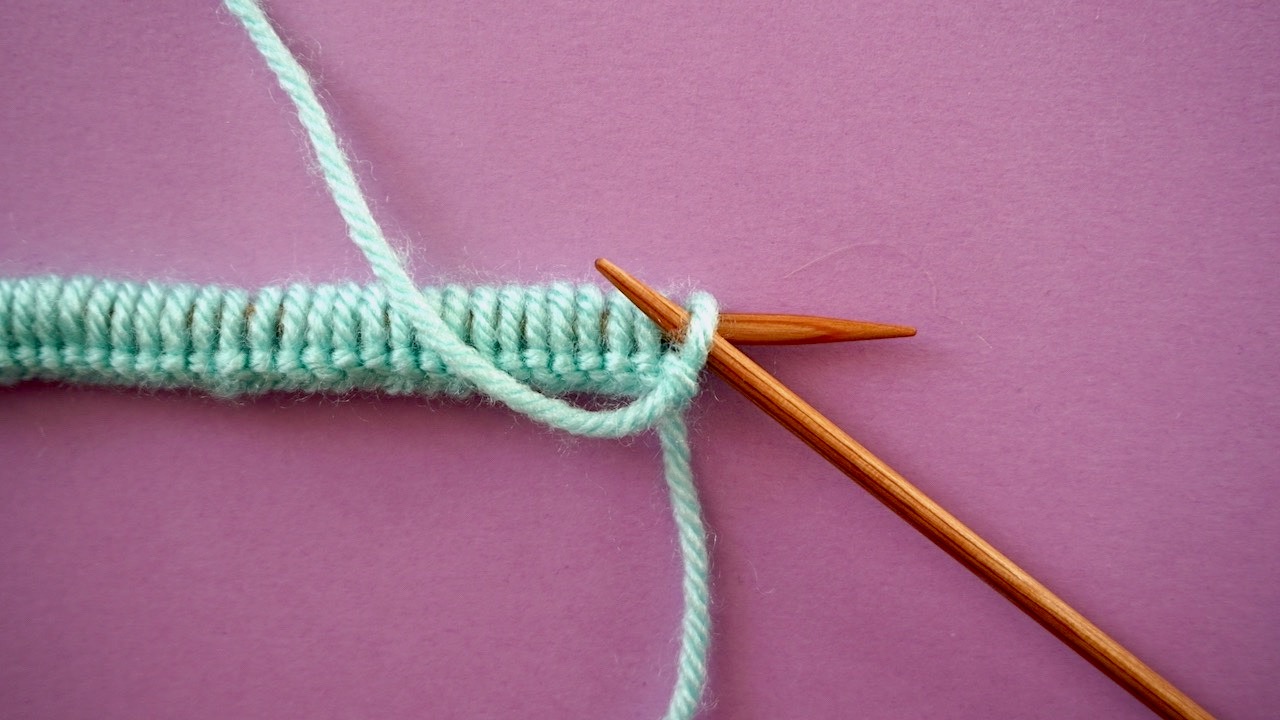
1. Cast On
Measure about 40 inches (100cm) of yarn for the long tail cast-on.
Next, tie a slip knot and place the slip knot on two straight or double pointed needles. You want to use two needles instead of only one so that the stitches will be loose enough. This way, it will be easier to knit the stitches and also the edge of the potholder will not be too tight. You want the potholder to look like a square once finished and if the cast on is too tight, this will make your edge curved.
Finally, cast on 39 stitches (40 stitches in total as the slip knot will be your first stitch). When you are done casting on, remove one needle, and you will see that your stitches are bigger but still nice and even.


2. Knit the Rows
With the yarn in front of the work, slip the first stitch of the row purlwise. This means that you insert the right needle into the stitch from right to left. This makes the edge stitch to turn sideways, leaving a clean and neat chain edge.
Next, take the yarn to the back of the work and knit to end of row.


Continue to knit every row like this. Knit as many rows as you need to knit a square. In my potholder, this was 72 rows. You can measure the correct length by folding the work into a triangle. When the edges meet, you have a square.

3. Bind Off
To bind off, slip the first stitch from your left needle to your right needle purlwise with the yarn in front. Then take the yarn to the back of your work and knit the next stitch onto the right needle.


Insert the left needle into the stitch you slipped. Then pull it over the knit stitch and off the right needle.


Next, knit another stitch on the right needle and pull the previous stitch over it and off the needle. Continue this to bind off the entire row until you have one stitch left on your right needle.
4. Make the Hanging Loop
Create a hanging loop for your potholder by casting on 20 stitches next to the last stitch on your needle. Check out the step-by-step instructions for casting on stitches at the end of a row here.

Now you will have 21 stitches on your needle. This amount of stitches will measure for about a 2-inch (5cm) finished hanging loop. If you want, you can adjust this number for any length you like. Just keep in mind that you will fold it in half, so make it twice the finished length.
Next, turn your work and and bind off all stitches. To do this, knit first two stitches onto the right needle. Insert the left needle into the stitch you knitted first, then pull over the last stitch and off the right needle.

Bind off the last stitch by cutting the yarn with a 8-inch (20cm) tail and pulling it through the last stitch on your knitting needle. Pull the end tight to secure the finished potholder.

Using a tapestry needle, connect the tail end of the yarn to the corner of your potholder. Sew the loop properly down into the corner stitch and tie a double knot to secure.

If you don’t want to make a hang loop for your potholder, you can skip this step. Just cut the yarn and take the last stitch off the right needle. Then pull out the tail out of the stitch and tighten to secure the completed potholder. Alternatively, you can make a hanging loop by crocheting or using a strip of fabric or leather.
5. Weave in the Ends
Finally, weave in the extra tail end with the tapestry needle and cut off any extra length. Next, also weave in the tail end at the beginning of your potholder.
You’re finished!

Basic Knitted Potholder in Moss Stitch
This basic knitted potholder pattern in moss stitch is still beginner friendly even though the pattern may seem complicated at first glance. However, in addition to the basic techniques required in the first pattern, this potholder pattern includes only one additional technique, that is purling.
Moss stitch is a great pattern for potholders as it makes the fabric a bit thicker and stiffer. The end result resembles a woven basket, and the right and wrong sides look the same.

Materials You Will Need for This Potholder
- Medium weight yarn
- US 6 (4mm) straight needles or double pointed needles
- Tapestry needle
- Scissors
- Sewing needle
- Small piece of leather
- Sewing thread that matches the leather
Instructions
Begin
Measure about 40 inches (100cm) of yarn for the long tail cast-on and make a slip knot.
Cast on 40 stitches on two needles. If you end up using a different amount of stitches, make sure that you have an EVEN number of stitches to follow these instructions.
Start row 1 by knitting one stitch and then purling one stitch until you have completed the first row. Then reverse the fabric and repeat knitting one and purling one until you have finished row 2.
Next, you will change the order of the stitches. Start by purling one and then knitting one and continue across all stitches of row 3. Then reverse the fabric again and repeat purling one and knitting one until the end of row 4.

Continue repeating these four rows until you have a square shaped pot holder. You have a square when the edges meet when folding the fabric in triangle. In my potholder, I continued these four rows 14 times or knitted a total of 56 rows.
Finally, bind off all stitches of the last row. To do this, knit one stitch and purl one stitch onto the right needle—or the other way around depending on how your previous row was knitted to keep the pattern. Insert the left needle into the knit stitch and then pull it over the purl stitch and off the right needle. Keep in mind to bind all knit stitches in knit and all purl stitches in purl this way.
Finishing
Once you have one stitch left on your right needle, cut the yarn with a 8-inch (20cm) tail and pull it through the last loop. Pull the end tight to secure the finished potholder. Next, weave in the ends with a tapestry needle.
Make the Hanging Loop
For the hanging loop, cut the leather into a strip. Then place the leather loop into one of the top corners, about an inch or so down from the top so that the fabric is between both edges. Next, sew a few stitches with the sewing thread along the edge to secure the hanging loop.
Your potholder is now finished!

Conclusions
Knitted potholders are a practical and adorable addition to any kitchen. With a variety of patterns and designs available, you can create functional and stylish potholders that will protect your hands from hot pots and pans.
Once you have knitted both of these potholders, make sure to check out also this free double thick knit potholder pattern. It is a great little project for beginners and experienced knitters alike and one of my all time favorite knitted potholder patterns!
Whether you’re a beginner or an experienced knitter, making your own knitted potholders is a great way to unleash your creativity and add some charm to your kitchen. So grab your knitting needles and get ready to cook up some cozy potholders!
Read also: