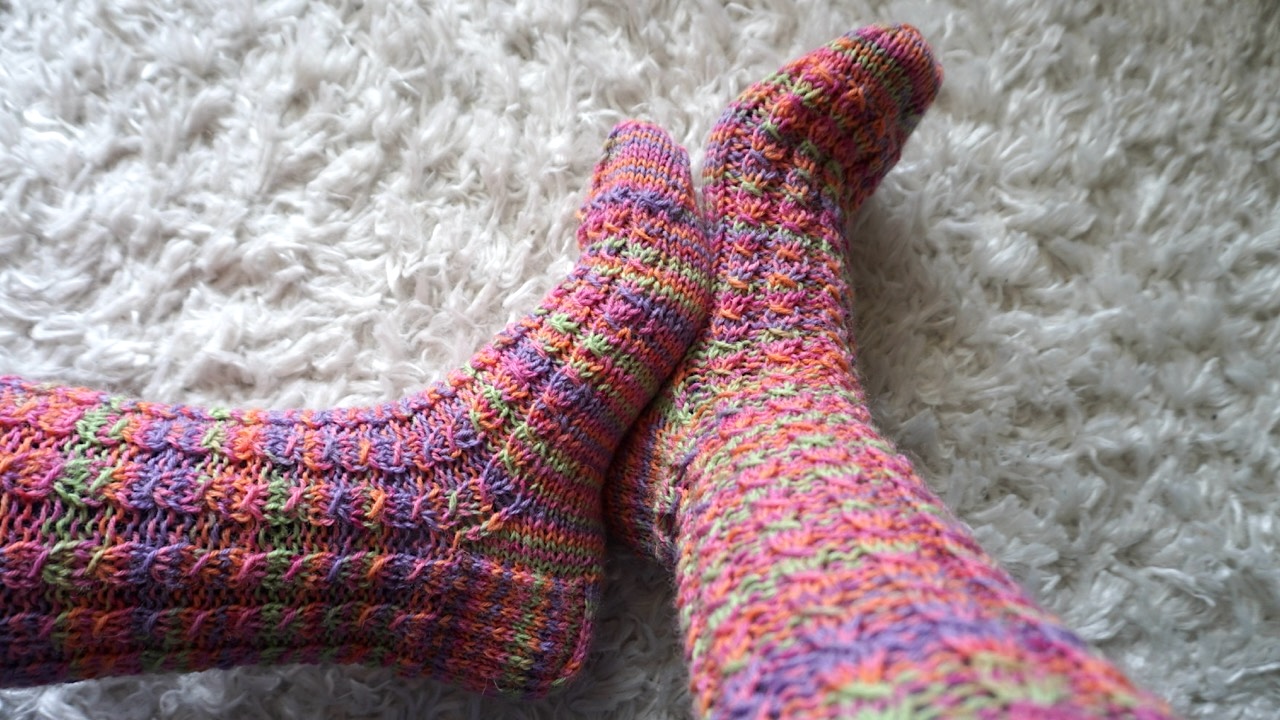
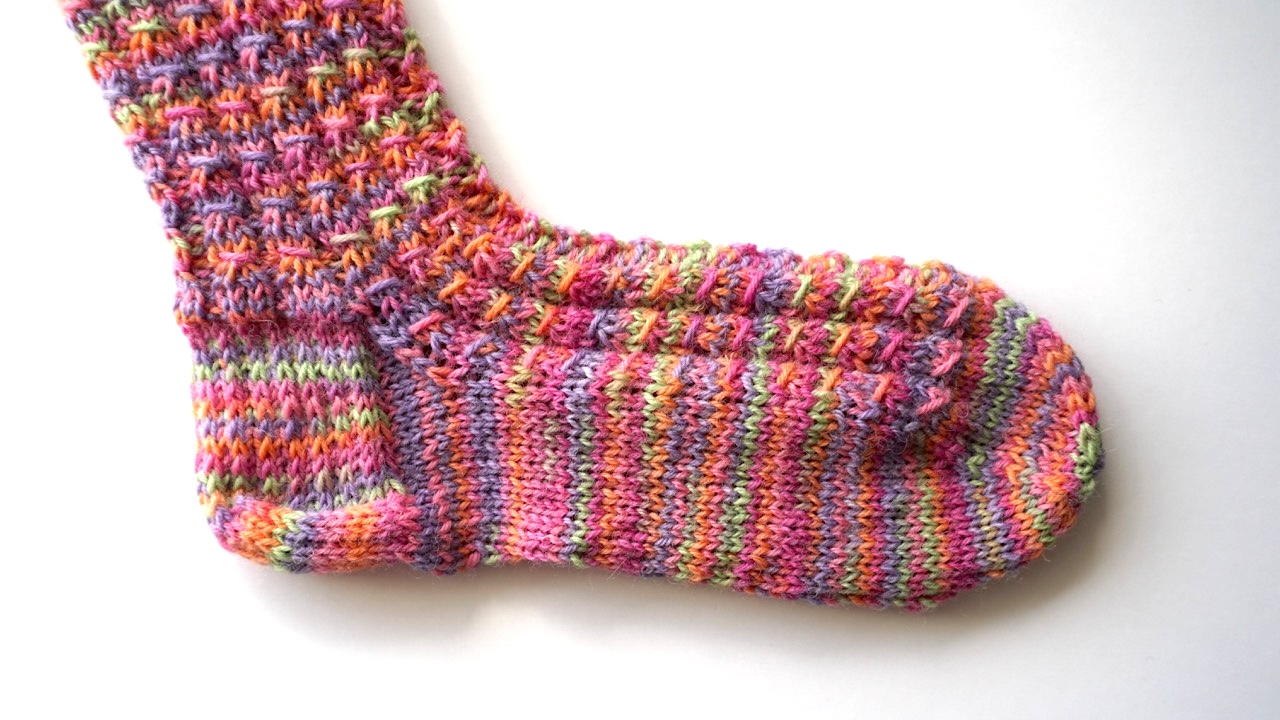
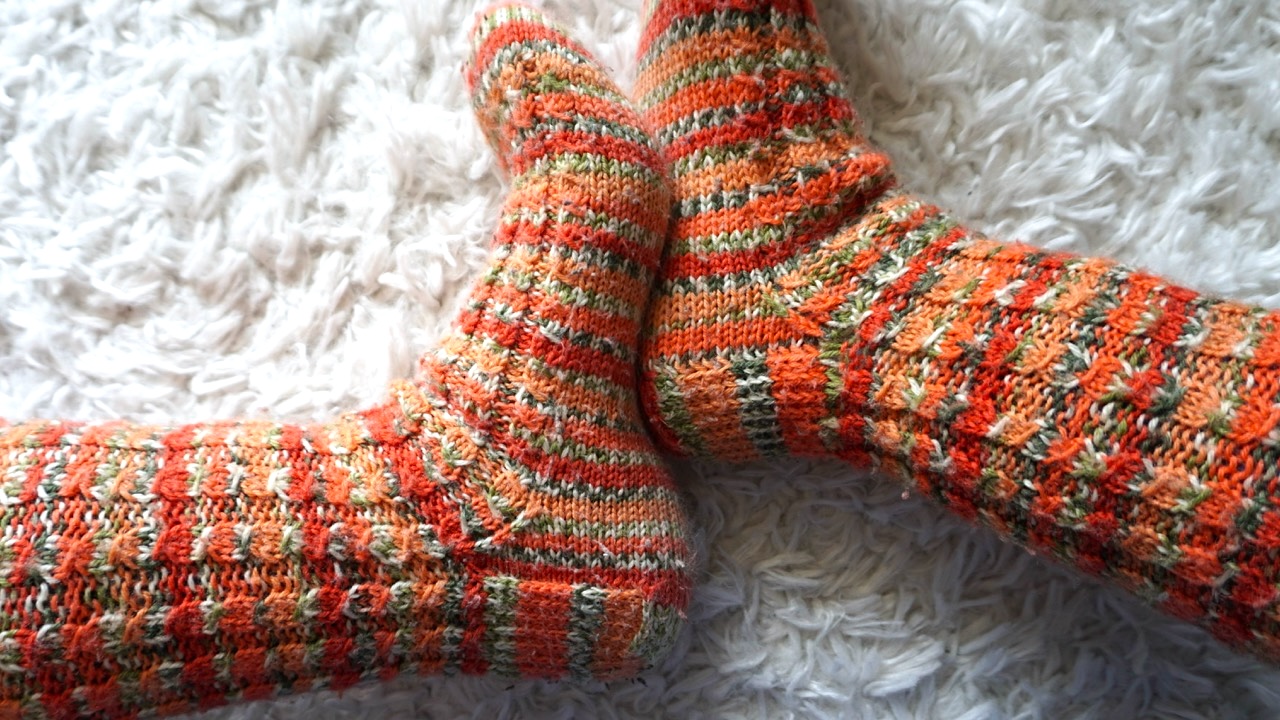
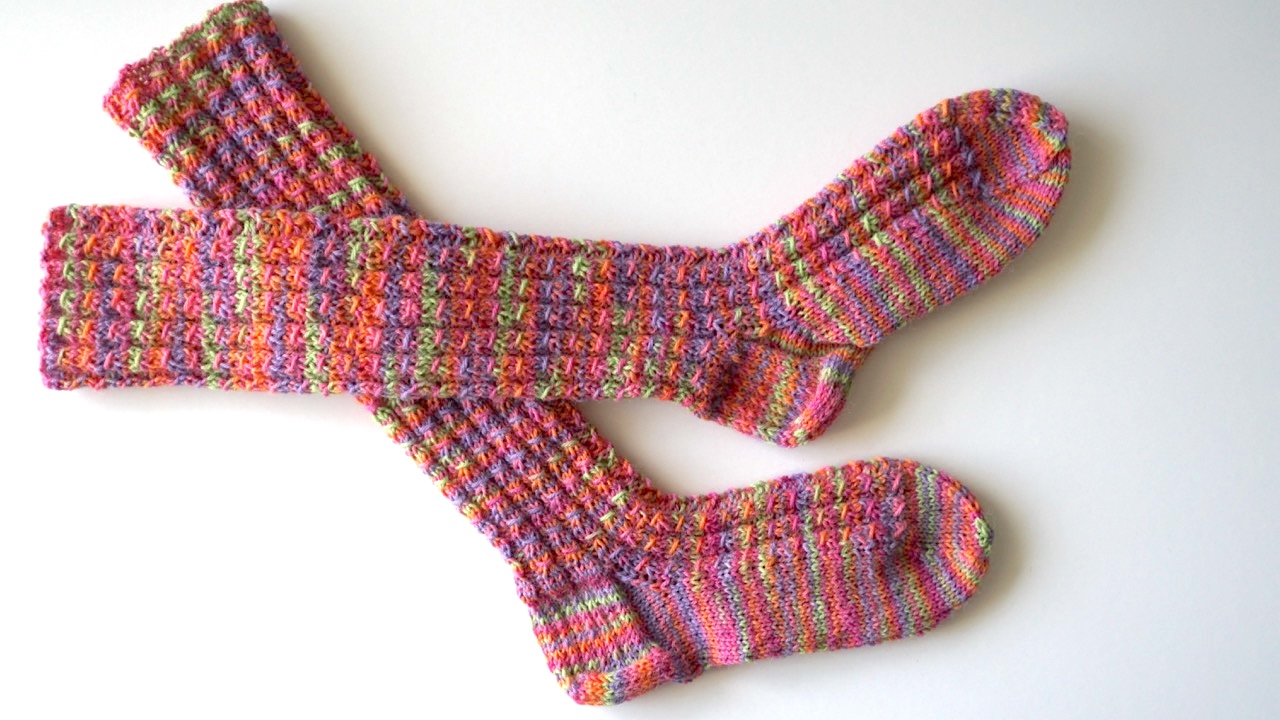
If you love the look of cables but want something easier to knit, this mock cable sock pattern is the perfect project. These mock cable socks feature a lovely twist-like texture that mimics traditional cables without using a cable needle. The result is a pair of soft, stretchy, and elegant socks that are both comfortable and beautiful.
This guide will walk you through the stitch pattern, the structure of the socks, and helpful tips for success. It’s written in a simple tone so even beginner knitters can follow along with confidence.
This post features affiliate links. If you use these links to buy something we may earn a commission at no additional cost to you. As an Amazon Affiliate we earn from qualifying purchases.
What Is a Mock Cable Sock Pattern?
A mock cable sock pattern uses a clever stitch combination to imitate the look of real cables. Instead of crossing stitches with a cable needle, you slip and lift stitches in a special order to create the illusion of twisted strands.
The beauty of mock cable socks is that they look complex but are actually very simple to knit. You only need to know how to knit, purl, slip a stitch, and make a yarn round needle. Because there’s no cable needle involved, the knitting flows smoothly and quickly.
The texture also has a bit more stretch than real cables. That’s why this stitch is perfect for socks. It hugs the leg nicely without feeling tight.
Another benefit is the rhythm. The mock cable stitch repeats over just a few rows, making it easy to memorize. Once you’ve knitted a few repeats, you’ll be able to work on your socks anywhere—on the couch, at a café, or while watching your favorite show.
This makes the mock cable sock pattern an excellent choice for beginners who want to try a textured sock knitting pattern that looks advanced but is easy to master. You can read more about the mock cable stitch here.
Materials and Yarn Suggestions
Before you begin, gather your materials. The right tools and yarn will make your faux cable socks both durable and soft.
You will need the following materials and tools for knitting these socks:
Skills Required: Cast on, bind off, knit, purl, mock cable, basic sock shaping
Dimensions: Fits women’s shoe size US 7–8 (EUR 38/39)
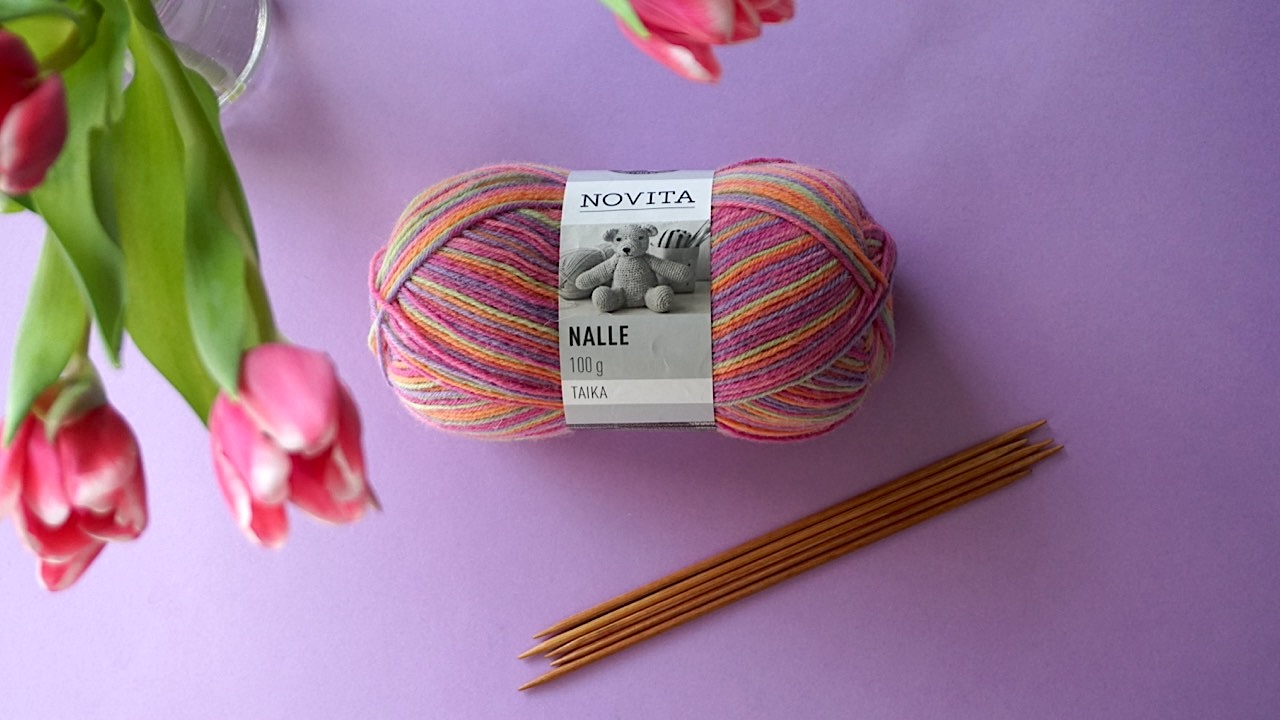
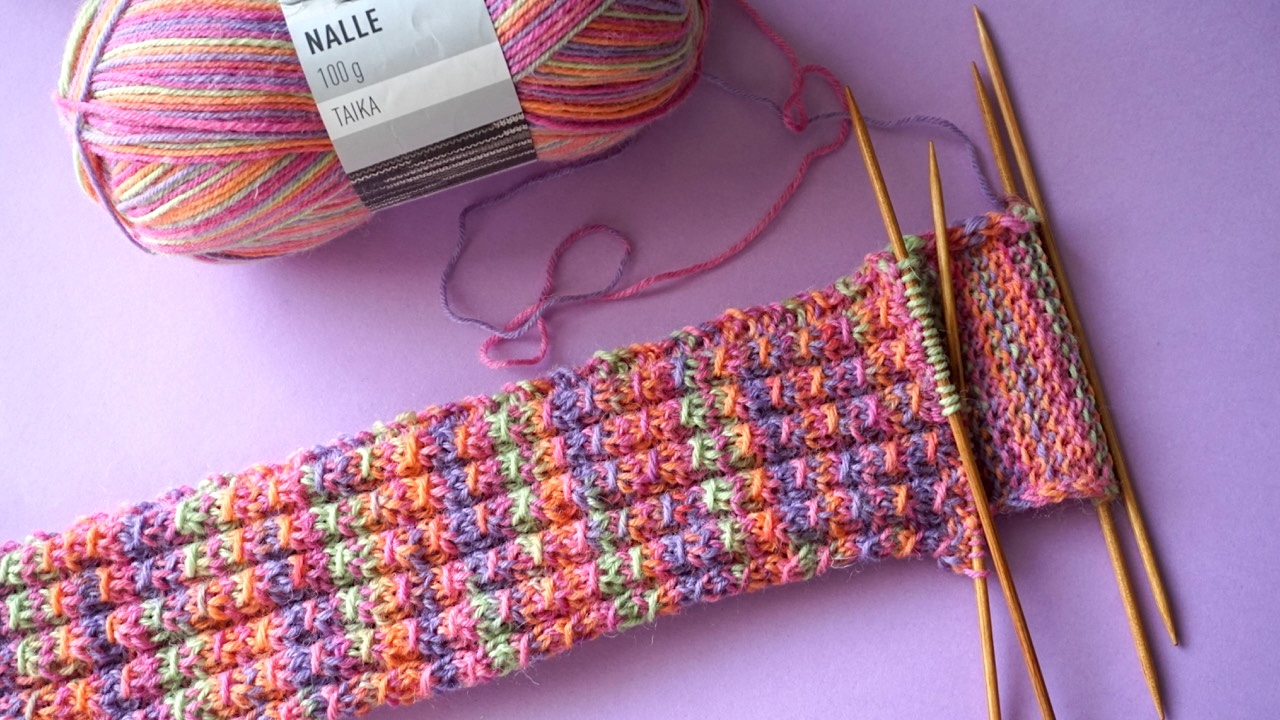
Yarn: About 600 yards (520m) or 7oz (200g) of DK/light worsted weight sock yarn
Needles: Size US 4 (3.5mm) or according to your personal knitting gauge
Gauge: 24 sts = 4 inches (10cm)
By following these instructions, you will knit a classic cuff-down sock with a reinforced heel flap. This method is how I usually make my socks. The directions will give you a good fit for women’s size US 7–8 (EUR 38/39).
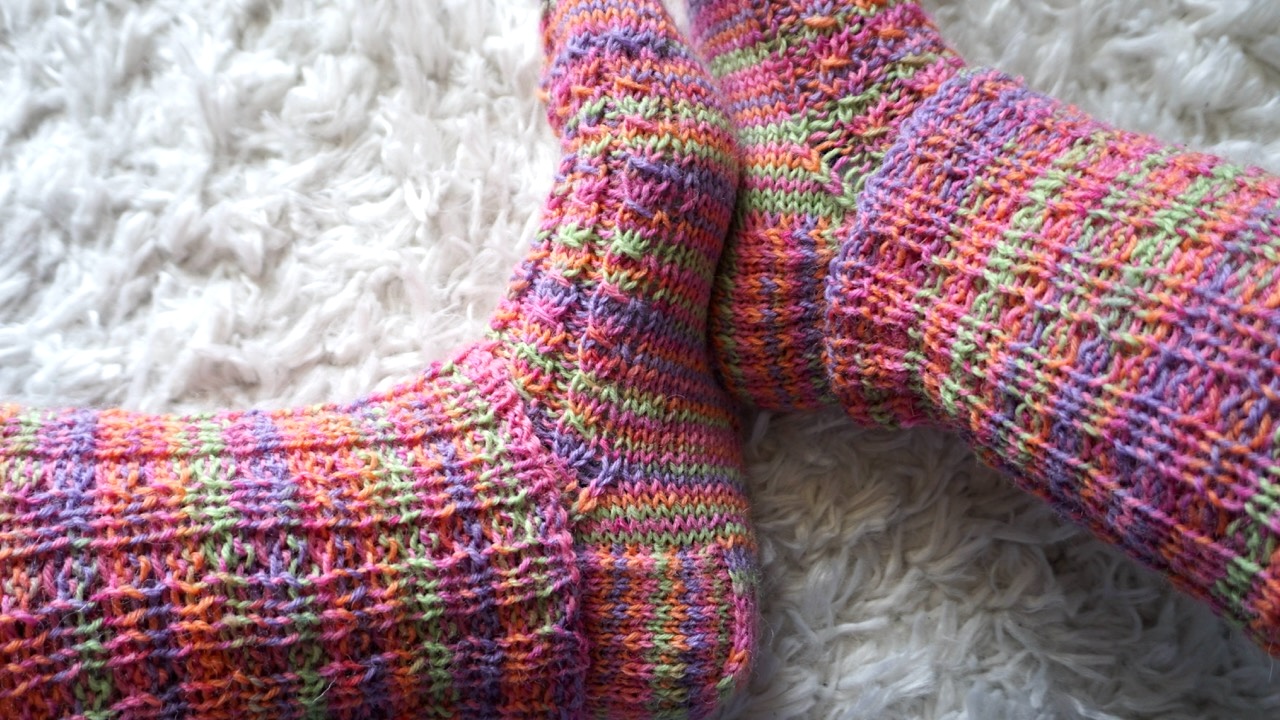
I am using Novita Nalle Taika yarn in color 8501 bucket and US 4 (3.5mm). The many color tones of the yarn create stripe-like design to the socks. This combination creates a soft and durable fabric that holds its shape beautifully.
It is easy to make the socks larger or smaller. Increase or reduce the number of stitches by five to keep the mock cable repeat intact. In other words, add or subtract stitches in multiples of five so the pattern lines up.
Since the cuff is quite long in this pattern, you will need two 7oz/100g skeins of yarn. You can also make the cuff in regular length—in this case, you will only need one skein of yarn.
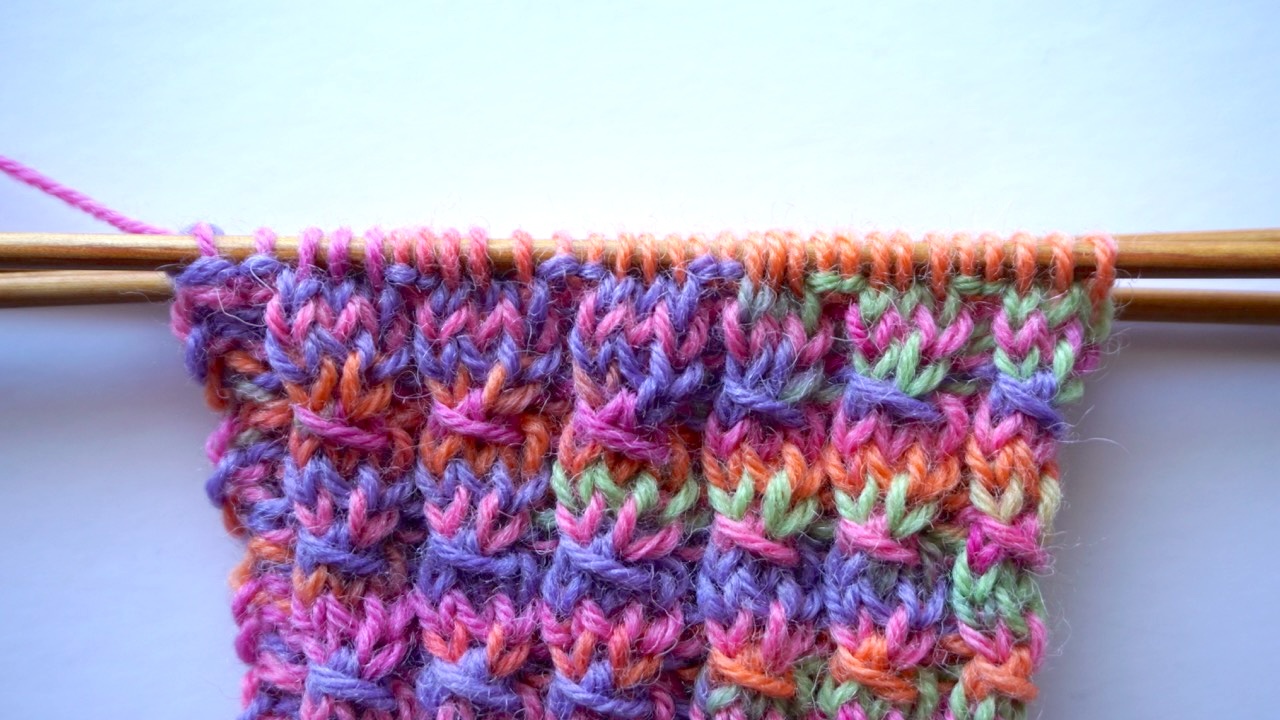
How to Knit the Mock Cable Stitch
The mock cable stitch creates a twisty, raised texture that looks like a cable but is easier to knit. It’s perfect for cuffs, socks, and scarves.
Below is the four-row pattern used in these mock cable socks.
Row 1: Slip 1 stitch knitwise, knit 2, pull the slipped stitch over the two knit stitches, and purl 2. Repeat to end.
Row 2: Knit 1, yarn round needle, knit 1, purl 2. Repeat to end.
Row 3: Knit 1, knit the stitch created by the yarn round needle through the back loop, knit 1, purl 2. Repeat to end.
Row 4: Knit 3, purl 2. Repeat to end.
Then repeat rows 1–4 throughout your project.
Please note that in this pattern, the stitch created by the yarn round needle will be knit through the back loop. This eliminates the hole or eyelet in the mock cable.
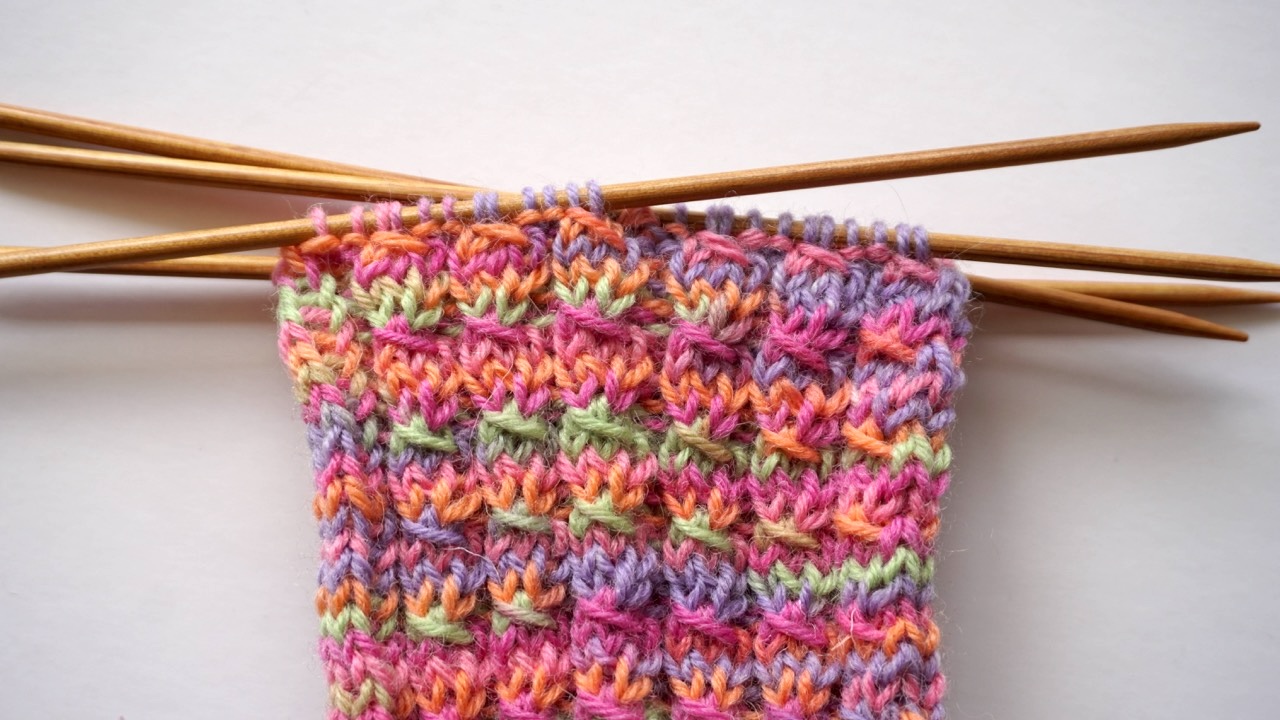
The mock cable is easy to spot after a few repeats. The small lift of the slipped stitch creates a lovely curve, giving the illusion of intertwined cables.
The pattern repeat is in multiples of five stitches, so you can easily adjust it to fit your sock circumference.
This simple sequence forms the foundation of your long cuff sock pattern and also appears on the top of the foot.
Step-by-Step Mock Cable Sock Pattern
You can find full, basic sock construction instructions in How to Knit a Sock. This section explains how to adapt that guide for the mock cable sock pattern.
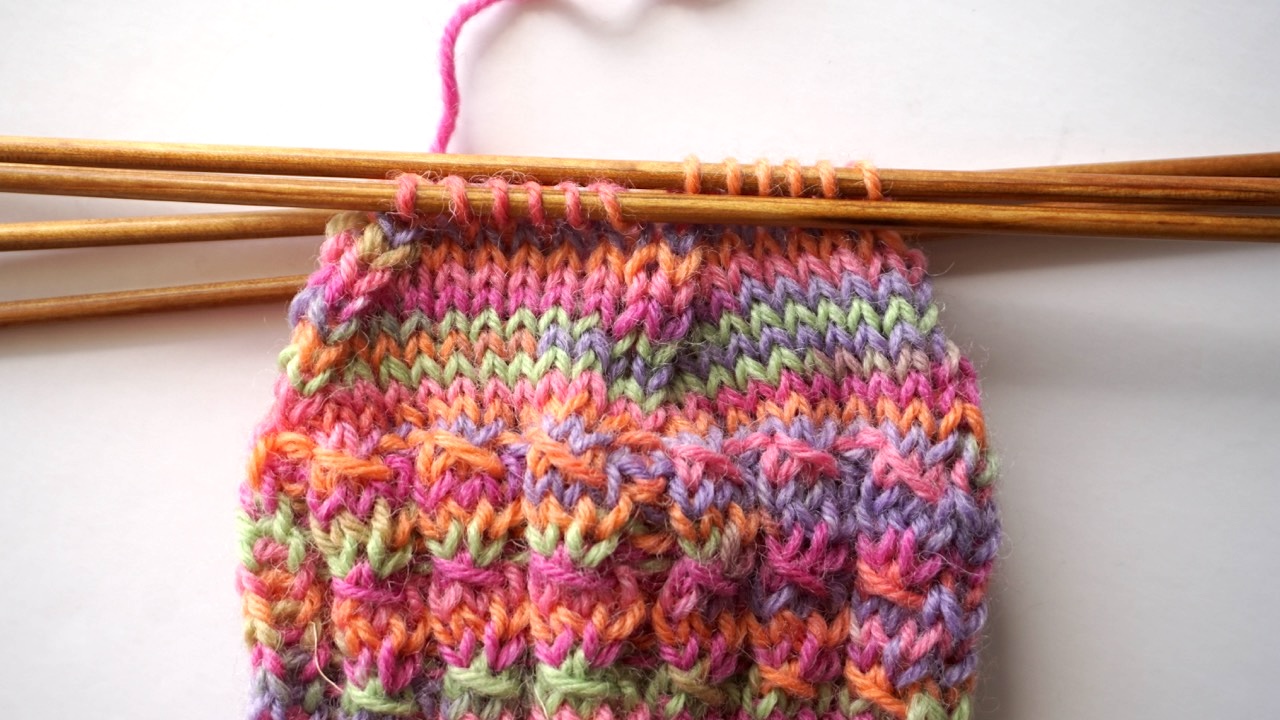
1. Cuff
Start by casting on 60 stitches. Then divide the stitches on four needles so that you’ll have 15 stitches on each needle. Join to knit in the round.
Work three rounds of ribbing 3 knit stitches and 2 purl stitches. Then begin the mock cable stitch pattern.
Row 1: *Slip 1 s knitwise, knit 2, pull the slipped stitch over the 2 knit stitches, and purl 2.* Repeat *-* to end.
Row 2: *Knit 1, yarn round needle, knit 1, purl 2.* Repeat *-* to end.
Row 3: *Knit 1, knit the yarn round needle through the back loop, knit 1, purl 2*. Repeat *-* to end.
Row 4: *Knit 3, purl 2*. Repeat *-* to end.
Then repeat rounds 1–4 a total of 25 times for a extra long cuff or until you’re happy with the length. The long cuff shows off the textured design beautifully.
Finally, knit rounds 1 to 3.
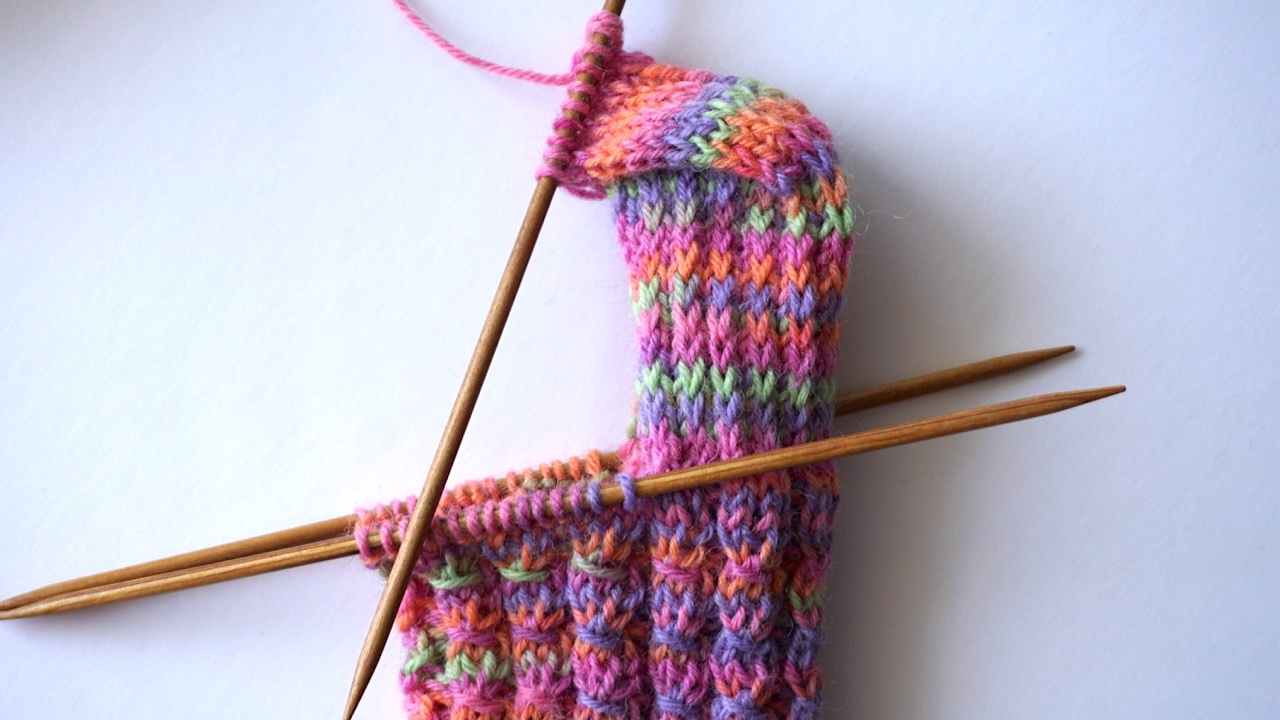
2. Heel Flap and Heel Turn
Once the cuff is complete, it’s time for the heel. For durability, work a reinforced heel flap using the slip-stitch method.
Start to knit the heel flap by knitting all stitches from needle 1 onto needle 4 in pattern knit 3, purl 2 (needle 1 becomes now your working needle).
Knit the heel flap by slipping 1 and purling across the wrong side. Then slip 1, and *knit 1 and slip 1* across on the right side. Repeat until you have 24 rounds in your heel flap. Finally, knit one more time the wrong side.
This reinforced pattern creates a thicker fabric that resists wear. It also gives the heel area structure, which helps your socks last longer.
Next, divide the stitches of the heel flap on three needles so that you’ll have 10 stitches on each needle. Then start knitting the heel turn using the standard method described in the basic sock guide.
3. Gusset and Foot
After turning the heel, pick up stitches 13 stitches along both sides of the heel flap. At this point, you will have 18 stitches on needles 1 and 4. Then knit one round on needles 1 and 4 and continue knitting the mock cable pattern on needles 2 and 3. You will start your mock cable with round 4 (as you already knit rounds 1 to 3 before knitting the heel).
Work the gusset decreases as usual so that you will finally have 12 stitches also on needles 1 and 4. Remember to continue knitting the mock on the top of the foot (needles 2 and 3) and plain stockinette on the sole (needles 1 and 4).
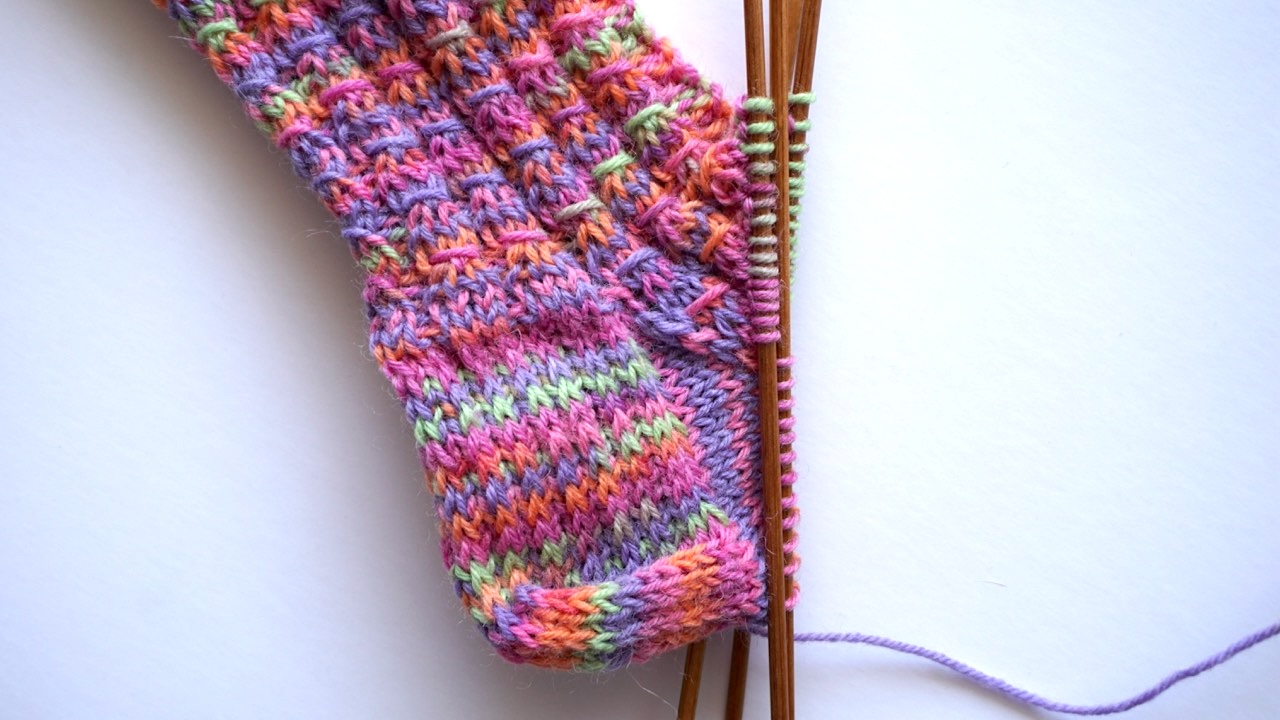
This combination makes the faux cable socks both attractive and practical. The mock cable texture decorates the visible part of the foot while the smooth sole feels soft inside shoes.
Continue knitting the foot until you have worked 12 additional mock cable patterns or approximately XX inches (cm). Then knit the first round of the mock cable pattern one more time. This way, you’ll have 12 stitches on all your needles.
From now on, continue knitting only plain stockinette.
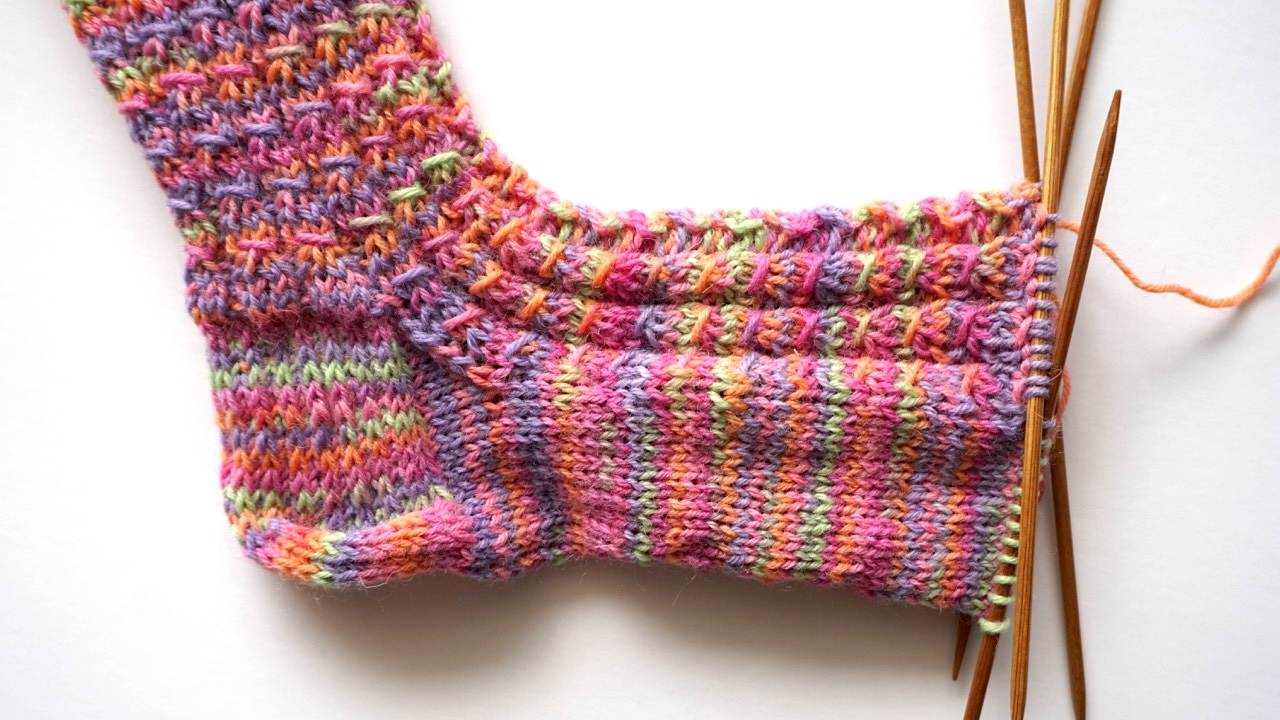
4. Toe
Finish the sock with the star toe. A star toe gives a symmetrical finish that complements the textured pattern.
*Knit until you have 2 stitches on your needle and knit 2 together.* Repeat *-* to end. Then knit one round even.
Alternate these two rounds until you have 6 stitches on each needle. Then continue decreases at the end of each needle on each round.
Decrease evenly around the sock until 2 stitches remain on each needle.
5. Finishing
Cut the yarn and thread it through the remaining stitches using a tapestry needle. Pull the yarn to tighten properly and repeat.
Finally, weave in all ends with a tapestry needle. Then block the socks lightly to open up the mock cable design.
Tips for Success with Mock Cable Socks
Check Your Gauge
Gauge can change slightly when using textured stitches. Always test your mock cable pattern before starting. If your cuff feels too tight, go up one needle size.
Keep the Mock Cable Even
Make sure the slipped stitch in round 1 doesn’t tighten too much. A relaxed tension helps the pattern stand out.
Avoid Holes in the Heel
When picking up stitches for the gusset, pick up one extra stitch in the gap between the heel flap and instep. This small trick prevents tiny holes at the corners.
Choose the Right Yarn
Because mock cable stitches create subtle shadows, solid or tonal yarns work best. Light or medium shades show the pattern clearly.
Make Both Socks the Same Length
It’s easy to lose track of rows when enjoying your knitting. Use a row counter or keep a note of how many repeats you’ve done for the cuff and foot.
Try Variations
Once you master the stitch, you can experiment. Try shorter cuffs, contrast heels, or colorful toes. The mock cable pattern also looks stunning in cozy bed socks or knee-highs.
Enjoy the Process
Mock cable socks are great for practicing mindfulness in knitting. The short, repeating rows are soothing, and watching the twist form keeps things interesting.
Why You’ll Love This Textured Sock Knitting Pattern
Knitting socks can be addictive. Each pair feels like a small, personal project full of creativity. The mock cable sock pattern is especially satisfying because it combines elegance with simplicity.
Here are a few reasons knitters love mock cable socks:
- They look advanced but are easy to knit. You get the visual impact of cables without extra tools or effort.
- They stretch beautifully. The pattern adds structure but keeps flexibility, making the socks fit comfortably.
- They’re durable and practical. The reinforced heel and smooth sole mean you can wear them often.
- They’re customizable. You can adjust the cuff length, foot size, or color combination to suit your taste.
- They make thoughtful gifts. Handmade socks always impress, especially when they have beautiful texture.
The design’s versatility also helps it rank among the most popular types of textured sock knitting patterns. Because mock cables are simple, knitters of all skill levels can enjoy making them.
If you’re new to socks, this project teaches you useful techniques like picking up stitches, shaping toes, and reading a pattern in the round. If you’re experienced, it offers a relaxing and rewarding knit that still looks intricate.
Faux Cable Socks vs Real Cable Socks
You might wonder how faux cable socks differ from traditional cable designs. The difference is all in the method.
In real cables, you use a cable needle to cross stitches over each other. This process creates a raised braid or twist, but it can slow down your knitting.
In faux cables, like this mock cable stitch, you simply slip and lift stitches to simulate the same effect. It’s faster and easier, with fewer tools required.
The result is a fabric that’s lighter and stretchier. That’s why faux cable socks are ideal for everyday wear. They slide easily into shoes, keep their shape, and still have that handcrafted charm.
If you love texture but dislike fiddly techniques, mock cables give you the best of both worlds.
Expanding on the Long Cuff Sock Pattern
A long cuff sock pattern adds both warmth and style. Longer cuffs help socks stay up better, and they showcase textured stitches beautifully.
When working mock cables, longer cuffs let you repeat the pattern more times, highlighting the delicate twists.
You can fold them over for a cozy, layered look or leave them tall for extra warmth under boots. I personally prefer knitted socks with a long cuff because this way, I can fold them over and get extra warmth for my ankles. Keep in mind though that the mock cable pattern is not reversible, so the back side will look like 2 knit x 3 purl ribbing when folded.
To ensure comfort, make sure your cast-on edge is stretchy. A simple long-tail cast-on works well. It provides elasticity while keeping the top edge neat.
Blocking and Care
Once your socks are finished, blocking makes a big difference. Wet the socks gently in lukewarm water with mild wool wash, then squeeze out excess water. Shape them on sock blockers or lay them flat to dry. You can check the detailed instructions for blocking socks here. And if you feel extra creative, you can even make your own sock blockers with these instructions.
Blocking defines the faux cables, smooths the fabric, and gives your socks a professional finish.
For care, hand-wash or machine-wash on gentle in cool water. Air dry flat to preserve elasticity and stitch definition.
With good care, your mock cable socks will stay soft and beautiful for years.
Final Thoughts
This mock cable sock pattern proves that you don’t need complex cables to create elegant texture. The mock cable stitch delivers the same beautiful twist with less effort, making it perfect for beginners.
The combination of a long cuff, reinforced heel, and textured foot gives you a pair of socks that’s both stylish and practical. Whether you knit them for yourself or as a gift, they’ll quickly become a favorite.
So grab your needles, choose a lovely skein of sock yarn, and start your next pair of faux cable socks today. You’ll love watching the pattern grow with every round.
Happy knitting!
Read also:
- A Beginner’s Guide to Knitting Socks
- Mock Cable Knit Stitch: Easy Way to Knit the Look of Cables
- How To Knit a Sock the Easy Way
- Knitted Sock Size Chart: A Guide to Perfect Fitting Socks
- Knitting Sock Toes: 7 Different Techniques
- Here’s How To Make Your Own Sock Blockers
- Knitting with Four Double Pointed Needles: A Beginner’s Complete Guide
- 31 Gifts To Knit for Every Occasion