Knitting with four double pointed needles can seem tricky at first. But once you get the hang of it, it opens a world of projects. From socks to mittens, this method helps you knit small tubes in the round with ease.
This guide will walk you through everything you need to know. I’ll cover tools, setup, common issues, and tips. Whether you’re new to knitting or just new to double pointed needles, this post is for you.
This post features affiliate links. If you use these links to buy something I may earn a commission at no additional cost to you. As an Amazon Affiliate I earn from qualifying purchases.
What Are Double Pointed Needles?
Double pointed needles, also known as DPNs, are short needles with points at both ends. They come in sets of four or five. These tools let you knit in the round on small items, such as socks and mittens. When you’re knitting on dpns, the stitches move from one needle to the next in a circle.
DPNs are typically 5 to 8 inches long. They’re available in various materials like wood, bamboo, plastic, or metal. Bamboo is ideal for beginners because it grips yarn better. Metal is smooth and fast but more slippery. Plastic is light and affordable, though it can bend or break more easily.
You can read more about double pointed needles and other types of knitting needles here.

Why Use Four Double Pointed Needles?
Knitting with four double pointed needles gives you better control. You knit with the fifth needle while the other four hold your stitches. This setup makes it easier to manage tight curves and small rounds.
It also avoids pulling or stretching, which can happen with magic loop or two circular needles. When you knit with double pointed needles, the fabric stays even and smooth. It’s also easier to check your tension, especially for small-circumference items.
Some knitters prefer four needles holding the stitches and one to knit with. Others prefer using only three to hold the work. Try both and see which feels more natural to you.
Getting Started: Tools and Yarn
Before you begin, gather your supplies. Here’s what you need to start knitting with double pointed needles.
Choose the Right Needles
Double pointed needles come in many sizes and materials. Wood or bamboo is great for beginners. They grip yarn better and prevent slipping. For faster knitting, metal needles work well but can be slippery.
I like using birch double pointed needles similar to these Knit Picks Double Pointed Knitting Needles. I like that they are smooth enough so that stitches glide along the needle easily, but not too slippery.
Choose a needle size that fits your yarn. Most yarn labels suggest a needle size. Stick with that for best results. For example, worsted-weight yarn often pairs well with US size 7 or 8 needles.

Pick the Best Yarn
Worsted or DK weight yarn is best for learning. It’s not too thin or thick. Avoid dark colors at first since it’s hard to see stitches. Lighter colors make your work easier to read.
Choose a smooth yarn rather than a fuzzy or textured one. This will help you see your stitches clearly and fix mistakes easily.
Use Stitch Markers and Row Counters
When knitting with four double pointed needles, it’s easy to lose track of rows.
You can use stitch markers to mark a certain number of rounds. This way, you don’t need to count rounds every time from the beginning but you can lock the stitch marker into a stitch, let’s say like on row 10, and remove it later on in the project.
To mark a stitch, simply lock the stitch marker around the stitch itself. Locking stitch markers are the go-to stitch markers for this purpose. My favorite locking stitch markers are from NBEADS, such as these NBEADS Strawberry Penguin Stitch Markers. They come with lobster claw clasps that are easy to open and close.
Alternatively, you can also use a row counter to keep track of rounds, so you don’t lose your place. This classy handheld row counter is one of my favorites as it is reliable and easy to use.
You can also use a small notebook or app to jot down each completed round. Whatever works best to help you stay organized.
Unlike in circular knitting, the beginning of the round will be easy to spot when you knit with double pointed needles. You can just look for the cast on end tail as it always sits between needles 1 and 4 and marks the end of a round and a beginning of a new one. So you don’t need to use a stitch marker to mark that. It would actually be impossible as it would sit at the end of one of the double pointed needles and would just drop off your needle.
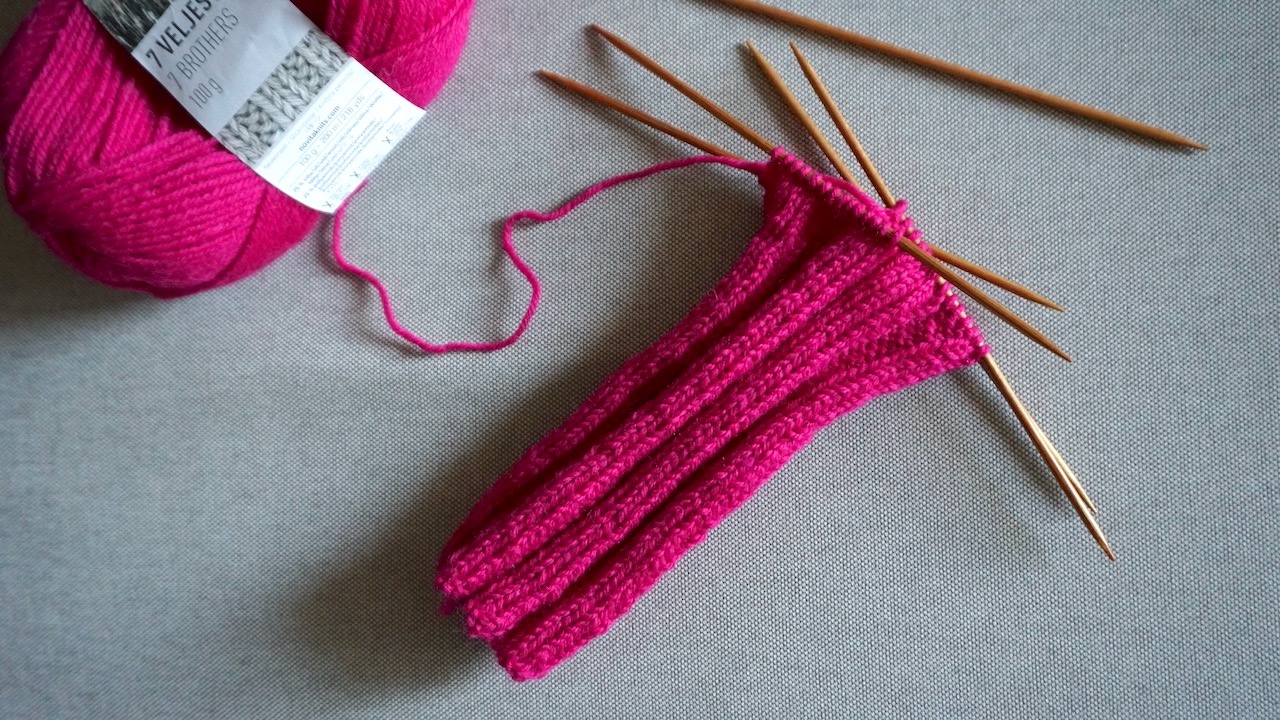
How to Knit With Four Double Pointed Needles
Let’s walk through how to cast on and start knitting with four double pointed needles.
Step 1: Cast On Your Stitches
When knitting with double pointed needles, you will cast on as you normally would.
Start by casting all your stitches onto one needle, or you can use two double pointed needles to make the cast on edge less tight. You can use your preferred cast on method, however, I recommend the long tail cast-on for a smooth edge.

Step 2: Divide Your Stitches on Four Double Pointed Needles
Once you have cast on the required number of stitches, distribute your stitches evenly across four needles. The 5th needle will be your working needle.
For example, if your pattern calls for 40 stitches, you’ll place 10 stitches on each of four needles. To do this, slide the stitches evenly from the first needle onto the others. Adjust them gently so the tension stays even.
Here’s how to do it:
- Take one needle and then slip 1/4th, or ten, of your cast-on stitches on this needle as if to purl by inserting the needle into the stitches from right to left.
- Then pick up another needle and slip 10 more stitches on this needle.
- Next, take a third needle and transfer another 10 stitches on this needle.
- Now you have the same number of stitches on all four needles.

Step 3: Join in the Round
Once you divide your stitches, arrange the needles in a square. Make sure you haven’t accidentally twisted your needles and your stitches. Your cast-on edge should point towards the center without twisting around the needles.
Pick your needles up so that you’ll hold the 1st needle in your left hand and the 4th needle with the cast-on tail end in your right hand.
The needle with the stitches you’ll knit first is called needle 1 and the needle with the stitches you’ll knit last along with the cast-on tail end is called needle 4. Needle 2 and needle 3 are between these two needles. The fifth needle without any stitches is your working needle.

Now you’re ready to join in the round.
First, insert your right needle (or your 4th needle) into the first stitch on your left needle (or your 1st needle) purlwise. Then slip this stitch onto your right needle.
Next, insert your left needle into the original last cast-on stitch on your right needle. Then lift this stitch over the slip stitch, off your right needle and onto your left needle.

This joins your work in the round and eliminates the gap at the beginning of your project.
Make sure to check the detailed instructions with images for joining in the round here. You can also find an alternative way for joining in the round with double pointed needles.
Step 4: Begin Knitting
Then, simply pick up your working yarn and use your 5th needle to work around all four needles. Always knit with the right-hand needle. When you finish one needle’s stitches, switch to the next one by moving the empty needle from your left hand into your right hand. Then start working on the next needle’s stithes.
Keep rotating through your needles this way. You’ll notice your work forming a tube as you go. Be sure to knit firmly on the first stitch of each needle to avoid stretched sections between the needles.
Step 5: Bind Off
When your project reaches the right length, it’s time to bind off.
Bind off as you normally would across the final round. After binding off the entire round, you need to create a seamless finish without any gap by connecting the start and end of the round. You can check the detailed instructions with images here.

Finally, use a yarn needle to weave in the ends neatly.
Tips for Smooth Knitting on DPNs
Knitting with double pointed needles takes practice. These tips will help you avoid common problems and knit with confidence.
Keep an Even Tension
Watch your yarn tension. If it’s too tight, the stitches will be hard to move. If too loose, you may get “ladders”—gaps between needles. To avoid this, pull the first stitch on each new needle a little tighter.
Ladders can also be minimized by keeping your stitches snug across the gap between needles. Don’t over-tighten, but give a gentle tug on the first two stitches.
Avoid Twisting When Joining
Always double-check your cast-on row before joining. Arrange the needles on a table in a square to make sure all stitches face towards the center.
Verify the alignment after a few rows to catch any twists early. If you continue knitting with a twist, the only way to fix it is to unravel your work and start from the beginning and nobody wants this.

Don’t Worry About the Needle Count
Some sets include five needles. You can use four to hold stitches and one to knit, or three to hold and one to knit. Use what feels comfortable.
If your project has a small circumference and you have fewer stitches—like a baby sock toe—you might want to divide stitches over three needles (in a form of a triangle) and knit with the fourth. Five needles would feel too bulky.
Practice Basic Techniques First
Before diving into socks or mittens, it’s smart to build your skills. Try knitting a small tube first. This gives you a feel for handling four double pointed needles. It also helps you learn how to knit in the round without worrying about shaping.
Get used to switching from one needle to the next. It may feel clumsy at first, but that’s normal. Focus on making your stitches even and avoiding gaps between needles.
If you make a mistake, don’t worry. That’s how you learn. Frogging a small swatch is easy. You’ll gain experience without the pressure of following a full pattern.
Once you feel comfortable with the basics, you’ll be ready to tackle more exciting projects. The key is to go slow, repeat often, and enjoy each small success.
Take Breaks and Relax
Learning to knit with four double pointed needles uses different muscles than regular knitting. At first, your hands may feel tense or your fingers may cramp. This is very common, especially when trying to keep the stitches from slipping.
To stay comfortable, take short breaks, stretch your hands, and relax your shoulders.
If your stitches feel tight, loosen your grip. You don’t need to hold the needles with force. Try to relax your hands and let the yarn flow more easily. This not only feels better—it also improves your tension.
Keep in mind that every knitter learns at their own pace. There’s no rush to master everything in one sitting. The more relaxed you are, the smoother your knitting will become. So take your time, rest often, and enjoy the journey.
Common Challenges and How to Fix Them
Everyone runs into issues when learning something new. Here are some problems you might face while knitting with four double pointed needles—and how to solve them.
Stitches Keep Slipping Off
Try using wooden needles. They grip better. You can also use needle stoppers when not knitting.
I personally love the needle stoppers made of silicone as you don’t need to worry about then slipping out. There are many cute looking stoppers available, such as these Flower and Leaf Needle Point Protectors.
When you put your project down, push the stitches to the middle of each needle. This helps prevent them from slipping off.
Ladders Between Needles
Pull the first stitch of each needle snugly. Keep your tension steady. You can also shift stitches every few rounds. This spreads the tension and avoids gaps.
Another trick is to knit two or three stitches from the next needle onto the one you just finished. This shifts the gap each time.

Twisted Cast-On
Before joining in the round, double-check that the cast-on edge is straight. If it’s twisted, start over. It’s better to fix it now than later.
Lay the needles on a table in a square to help see the twist. The cast-on edge should point towards the center without twisting around the needles or between the needles. If you find a twist, gently rotate the stitches back into the correct position.
Feeling Overwhelmed
Knitting with four double pointed needles can feel like juggling at first. So many needles, and so many stitches to manage! If you feel frustrated, that’s completely normal.
Start small. Focus on one step at a time—cast on, divide stitches, then join in the round. Use tools like stitch markers or rubber needle tips to stay organized.
If things go wrong, it’s okay. Mistakes are part of learning. Take breaks, try again, and be patient with yourself. With practice, knitting on DPNs will start to feel easy and even fun.
Why Knitting with Double Pointed Needles Is Worth Learning
There are many ways to knit in the round. Magic loop, circular needles, and two circulars all have their place. But knitting with double pointed needles remains a classic choice.
Here’s why:
- Great for Small Projects: Socks, mittens, and sleeves are easier to manage with dpns.
- No Loop to Pull Through: You don’t need to adjust loops as you go.
- Compact and Portable: DPNs are short and easy to carry. No cable means fewer tangles.
- Traditional Technique: Many vintage patterns use dpns. Learning this skill opens up more project options.
- Smooth Circular Knitting: The result is seamless and even, ideal for garments worn close to the skin.
Once you learn how to knit with double pointed needles, you’ll be ready to follow patterns that use any circular method. DPNs are a foundation for more advanced techniques.
Best First Projects for Knitting on DPNs
Not sure where to begin? Try one of these beginner-friendly projects. Each lets you practice knitting with four double pointed needles.
- Baby Hat: A baby hat is small, simple, and quick to finish. It teaches you to shape the crown and decrease stitches in the round. Choose a soft, light-colored yarn.
- Tube Scarf: This project teaches how to knit a long tube. It’s easy and repetitive. Plus, no shaping means fewer mistakes. You can even turn it into a drawstring pouch or neck warmer.
- Fingerless Gloves: These work up fast and help you learn thumb openings and shaping. Use worsted yarn and a basic pattern. Add ribbing to help them stay snug on the wrist.
- Simple Socks: Socks are a classic dpn project. Start with a top-down sock in worsted yarn. It knits quickly and helps you learn heel and toe shaping. Look for beginner sock patterns.
- Stuffed Toys: Small stuffed animals or creatures are fun and quick. These projects let you practice increases, decreases, and stuffing your work. Try a knitted ball or tiny bear.
- Knitted Cozies: Make cozies for cups, jars, or even small plant pots. These projects let you knit in the round and practice simple stitch patterns. They make great gifts too.

Advanced Tips for Knitting on DPNs
Once you’re comfortable, try these advanced techniques while knitting on dpns.
- Working Cables: Yes, you can knit cables on double pointed needles! Use a small cable needle or a spare dpn to hold stitches. Follow cable charts as you would with flat or circular knitting.
- Knitting Lace: Lace patterns work well on dpns, especially for small projects like lacy socks or fingerless gloves. Use stitch markers between repeats to stay on track.
- Adding Colorwork: Fair Isle or stranded colorwork is possible too. Carry your yarn floats loosely across the back. Keep your tension even, and limit the number of colors per row.
- Shaping Projects: Learn to decrease smoothly for crowns of hats or gussets in socks. Practice K2tog (knit two together) and SSK (slip, slip, knit) on dpns for smooth shaping.

How to Care for Your DPNs
Take good care of your double pointed needles. They’ll last for years. Here are a few tips:
- Store in a Case: Keep your needles together and in order.
- Avoid Heat or Moisture: Don’t leave wooden needles in the sun or near water.
- Check for Damage: If your needles splinter or bend, replace them. Damaged needles can snag yarn.
- Wipe After Use: Especially if you have sweaty hands or are using metal needles, wiping them clean keeps them smooth.
You can find needle cases made just for DPNs. Alternatively, you can use a simple pencil pouch, zip bag, or roll-up fabric case to keep them safe.
I like this ChiaoGoo Double-Pointed Needle case as it zips closed and has marked size slots inside for all sizes of double pointed needles as well as a zipper storage pocket built into the outside.

Frequently Asked Questions
Can I knit flat with double pointed needles?
Yes, you can. Just treat them like regular needles and turn your work at the end of each row.
Is knitting on dpns hard for beginners?
It may feel awkward at first. But most knitters get used to it quickly. Start with a simple project to build skill.
How do I fix dropped stitches on dpns?
Use a crochet hook to pick up the dropped stitch. Work it back up to the current row, then place it on the needle.
Do I need to use all four needles?
Not always. You can use three needles to hold stitches and one to knit. Some patterns only need four total.
Can I switch from circular needles to dpns mid-project?
Yes! When the stitch count is too small for a circular needle, switch to dpns to finish in the round.
Final Thoughts
Knitting with four double pointed needles may look hard at first. But with practice, it becomes second nature. You’ll love the flexibility and control they give.
This technique is great for socks, hats, mittens, and more. Once you learn the basics, a whole new world of patterns opens up. Take it slow, be patient, and don’t be afraid to try again.
So grab your yarn and needles. Start small and enjoy the process. Before you know it, you’ll be knitting with double pointed needles like a pro!
Happy knitting!
Read also:
- Knitting With Circular Needles: The Simple Guide for Beginners
- Joining in the Round in Knitting: Easy Instructions
- How To Bind Off in the Round
- 6 Useful Knitting Tips for Beginners
- How To Make Knitted Hand Warmers
- Knitting Leg Warmers: Your Ultimate Guide With Free Patterns
- A Beginner’s Guide to Types of Knitting Needles
- Knitting Needle Sizes and Conversion Chart
- 10 Easy Knitting Patterns for Beginners